Table of Contents
We have a few numbers of storage classes available on Amazon’s S3 bucket service. Each storage option is available for a particular type of usage. But, what if we want to change the type of storage after some period of time, the thing is that Amazon let us do that also. One can easily change the one storage tier to another without touching the data stored with one. This can be easily and effectively done by “lifecycle rules” and we are going to learn about “lifecycle rule on an S3 bucket“.
Types of storage options available on S3 bucket (as of 2019 May):
- S3 Standard
- S3 – IA
- S3 One Zone – IA
- S3 – Intelligent Tiering
- S3 Glacier
- S3 Glacier Deep Archive
But, before proceeding further make sure you know -> How to Create an S3 Bucket
Question: What is a lifecyle rule and why we need one?
Answer: Lifecycle rule states about “how long a type of storage class has to be used“, and it can be used to “change a storage class type to another“.
Step 1: Create an S3 bucket for adding lifecycle rule
First of all, we are going to create an S3 bucket with the name “versioning-geekylane“, which we have created in the post -> version control on an S3 bucket
Note: The lifecyle rules require “versioning” must be enabled on S3 bucket.
Step 2: Add a lifecycle rule on an S3 bucket
We have to go to the “Management” tab after selecting an S3 bucket, for reference look at the screenshot used below.
After that, click on the “lifecycle” tab and further click on the “+ Add lifecycle rule” icon as shown below, in order to add a lifecycle rule.

Step 3: Specify rule name
As can be seen below, we have named our rule as “FirstLifecyleRule“, you can use anything you want.
After that, click on the “Next” icon in order to proceed further.

Step 4: Storage class transition
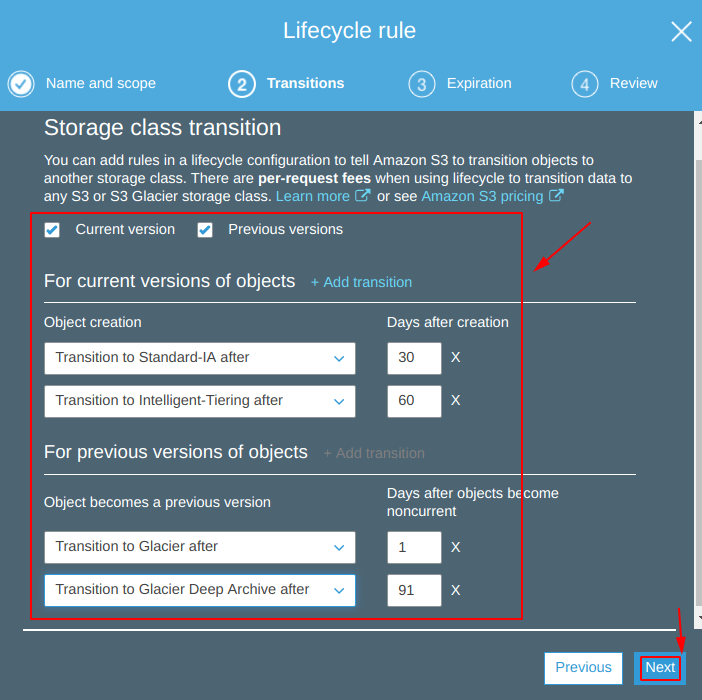
On this scree, you are going to actually specify to which you want to make a storage class transition.
For current versions of objects:
- Transition to Standard-IA = after 30 days
- Transition to Intelligent-Tiering = after 60 days
From above, we have specified that the objects which are going to be stored inside the bucket in the future, need to be changed to a “storage class = Standard-IA = after 30 days” and “storage class = Intelligent-Tiering = after 60 days” after the object is created.
For previous versions of objects:
- Transition to Glacier = after 1 day
- Transition to Glacier Deep Archive = after 91 days
From above, we have specified that the objects which are already stored inside the bucket, need to be changed to a “storage class = Glacier = after 1 day” and “storage class = Glacier Deep Archive = after 91 days” after the object become noncurrent.
After filling up the details about transitions to be made, click on “Next” icon.

Step 5: Configure Expiration
We can also specify when we want to delete objects stored in an objects.
Question: But why we need to do that?
Answer: Following can be a few reasons:
- Free up the storage space
- A new version of an object has to be used after a period of time
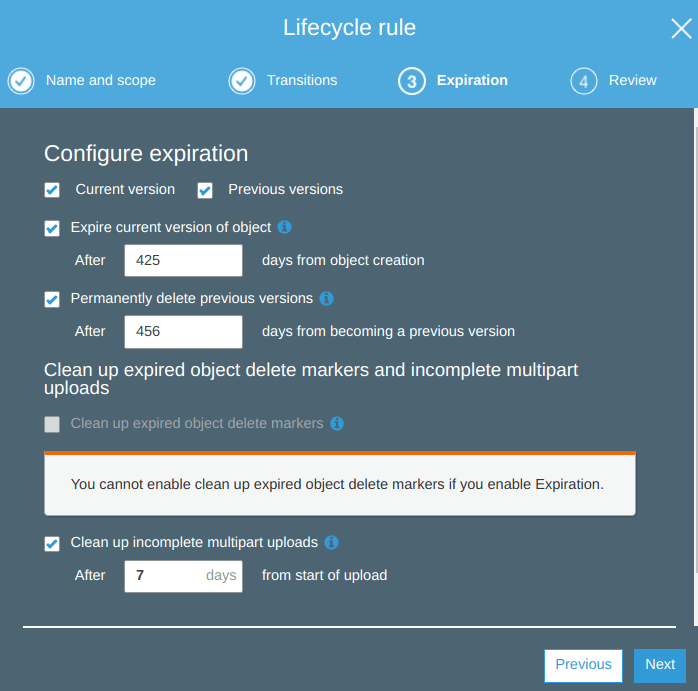
From below, we have specified the following:
- Expire current version of object = 425 days from object creation
- Permanently delete previous versions = 465 days from becoming a previous version
- Clean up incomplete multipart uploads = 7 days from the start of the upload

Step 6: Review lifecycle rule details
Before saving a lifecycle rule, make sure you double check the details specified for the rule, and after that click on the “Save” icon.

After saving the rule, we can again traverse to the “Management” section and under that “Lifecycle” tab, our newly create rule can be seen, for reference check the image below.

More on S3:
- How to enable version control on an S3 bucket?
- How to enable encryption on objects in an S3 bucket?
- How to create an S3 bucket on AWS?
More on AWS:
