Table of Contents
Setup and Configure PXE Installation server
Setting up a PXE server gives you access to seamlessly install a Linux Operating System via LAN or other network means. In this post, we are going to setup and configure
To achieve the task, follow the steps given below.
Step 1: You have to give IP-Address to your Linux Machine
At this stage, the very first step should be “giving IP-Address” to your Linux Machine so that it can communicate on the network with other network devices.
Simply check whether an IP-Address is already given to your machine or not and to check that run the following command:
$

Step 2: Yum configuration for Package Installations
Now to be able to install the required software/utilities on your machine, “yum” must be configured on your machine. Make sure your file should look like this.
Last 4 lines are important to you at this point.
Explanation of last 4 lines:
Line 1: “name=yummy” is the name for your yum server.
Line 2: “baseurl=file:///media” is the path for your CD-ROM’s mount point.
Line 3: “enabled=1” is the way are telling that use this configuration of yum server.
Line 4: “gpgcheck=0” is the way we are telling that do not look for keys.

Step 3: Permanently mount the ISO’s Files
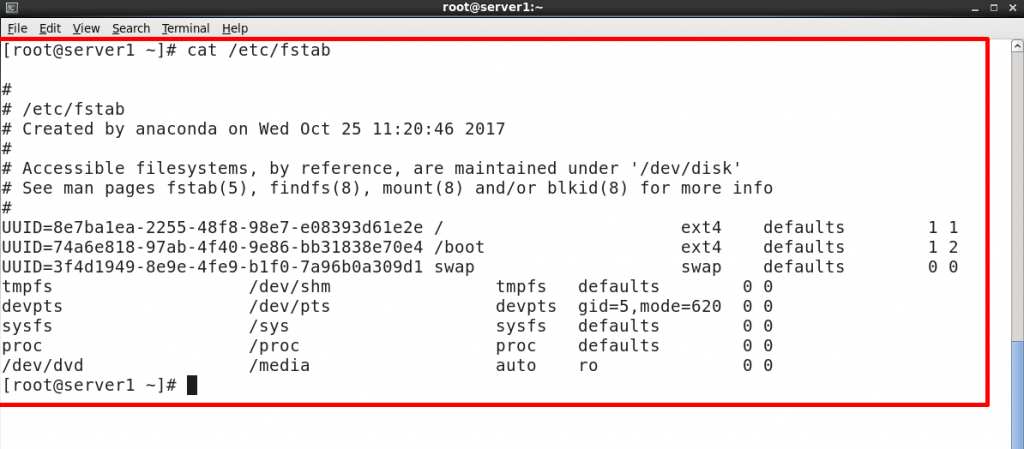
To be able to seamlessly work with yum-server you should permanently mount the ISO so that next time you restart your system the settings should be there as they are before.
Explanation of the last line in this file:
/dev/dvd: This is the block device.
/media: This is the mount point.
Auto: Use filesystem according to the block device( in this case iso9660).
Ro: Use the block device as read-only.
0 0: Some other options like disk-scan etc.
Step 4: Install Kickstart Package – setup and configure pxe installation server
Now to be able to create a “kickstart” file, there should be proper packages installed on your system. So to install them simply run the following command on your command-line:
$ yum –y install system-config-kickstart
After installing the above package you have to run the “kickstart” utility, so that you can create the “kickstart” file and to do so run the following command:
$ system-config-kickstart &
This will run the kickstarter utility on the background, now the next step is to configure your “kickstart” file as shown in the next screenshots.

Step 5: Copy ISO’s contents to “/var/ftp/pub/”
Question: How we are going to supply the ISO’s file to the client system?
Answer: There are many ways to do this but in our case we are using NFS to do so.
First of all you have to copy all the contents from the ISO mount on your machine’s /media/ directory to /var/ftp/pub/ and to do so, simply run the following command:
$ cp –a /media/. /var/ftp/pub/
After that you will see that the contents from ISO which is mounted on /media/ are copied to the /var/ftp/pub/.
Now you must be thinking that “Why we are doing all this?”, don’t worry I’ll explain you what is actually going on here.
We have copied the contents to the /var/ftp/pub/ so that we can share this directory over the network(NFS) and contents of this directory are going to be used as the contents required for the installation process on the client machines.

Step 6: Basic Configuration
Time to configure our “kickstart” file. Simply give the password(minimum 6 characters) and this password will be the password for the root account on the client systems after the installation.
Next thing we have to select is “target architecture” and in our
We have also “checked out” that “restart” the client system after installation and perform the installation in “text” mode.

Step 7: Installation Method
Now we also have to specify that whether we are going to perform:
- New Installation
- Upgrade and existing Installation
And in our case we want to install as “New Installation” on the client system.
Next we have to specify what our “Installation Source” is:
In our case we are using NFS as our installation source and by selecting that we also have to specify:
- IP-Address of the NFS server.
- Directory path on the NFS server.

Step 8: Boot Loader Options – setup and configure pxe installation server
Next thing we need to specify whether we want to:
- Install new boot loader
- Do no Install a boot loader
But ins our case we are going with the “Install new boot loader” because we want to install a new boot loader on each and every client machine’s hard disk.

Step 9: Partition Information
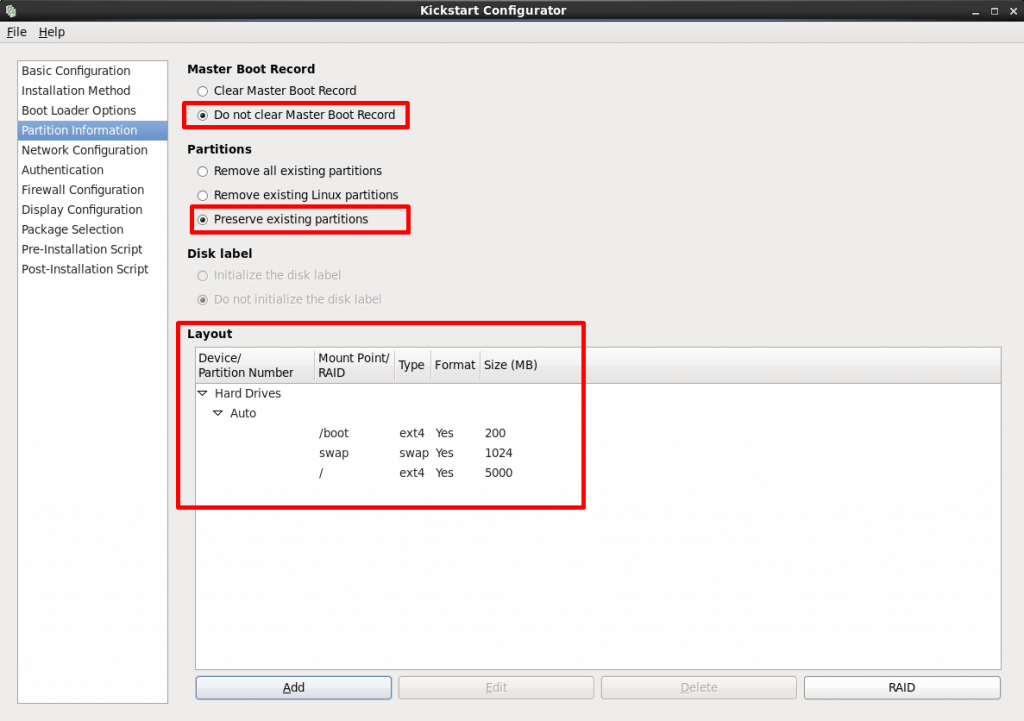
Now we have to specify that how many and what partitions are going to be on the client machine and to do so we have done the following:
/boot This is the first partition and it going to hold all the boot related files i.e why it is of 200MB only.
Swap This is not considered as a partition it is there so that in case of low memory the system is going to use it as a virtual memory.
/ This is most important of all because this is the main “root” partition and everything is going to be stored on this(everything).
Step 10: Network Configuration
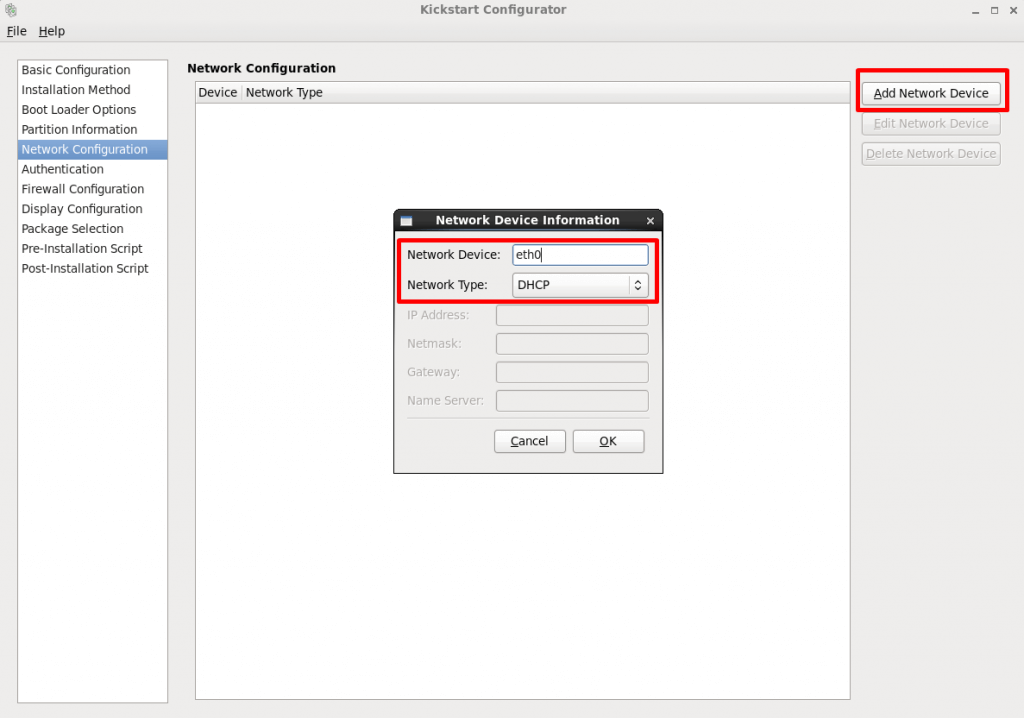
Now we have to specify that what kind of network configuration is going to be on the client machine when we are performing the installation.
We have to define:
- Network Device : eth0
- Network Type: DHCP
Eth0: This is the name of Ethernet card on the client machine.
DHCP: This means that via DHCP(Dynamic Host Control Protocol), client machine is going to have IP-Address on it.
Step 11: Authentication
Here we have to specify the “Authentication” type on the client machine.

Step 12: Firewall Configuration
Now we have to specify that whether we want “SELinux” and “Firewall” to be enabled or disabled on the client machine.
And in our case we are going to disable both of them.

Step 13: Display Configuration
Now we have to specify whether we want to install any “Desktop Environment” on the client machine or not.
Because we want to install one, so we are going to select this option as shown.
And by installing the “Desktop Environment” means:
When the user on the client machine they will be able to see:
- A GUI login-screen.
- Icons on the Desktop after logging-in.
- Plus they can do all there work with the help GUI on there screen
Question: Why there is a need to install a “Desktop Environment”?
Answer: Because it may be possible that the end-user on the client system do not have much knowledge about the Linux System.

Step 14: Package Selection – configure pxe installation server
Now we have to specify that:
Question: what “Packages” are going to be installed on the client system while the “PXE-Installation” is performd?
Answer: Select the one’s you wanted to install on your client systems.
You can select out of many available.

Step 15: Post-Installation Script
Question: What if by default you wanted to create at least 1 user on your client systems, then How you are going to do that?
Answer: You can specify some “Post-Installation tasks” with the help of “Post-Installation script”. And in our case we want to create “testuser” as a new user on the client machine and give it a password “1” (Not so Strong).

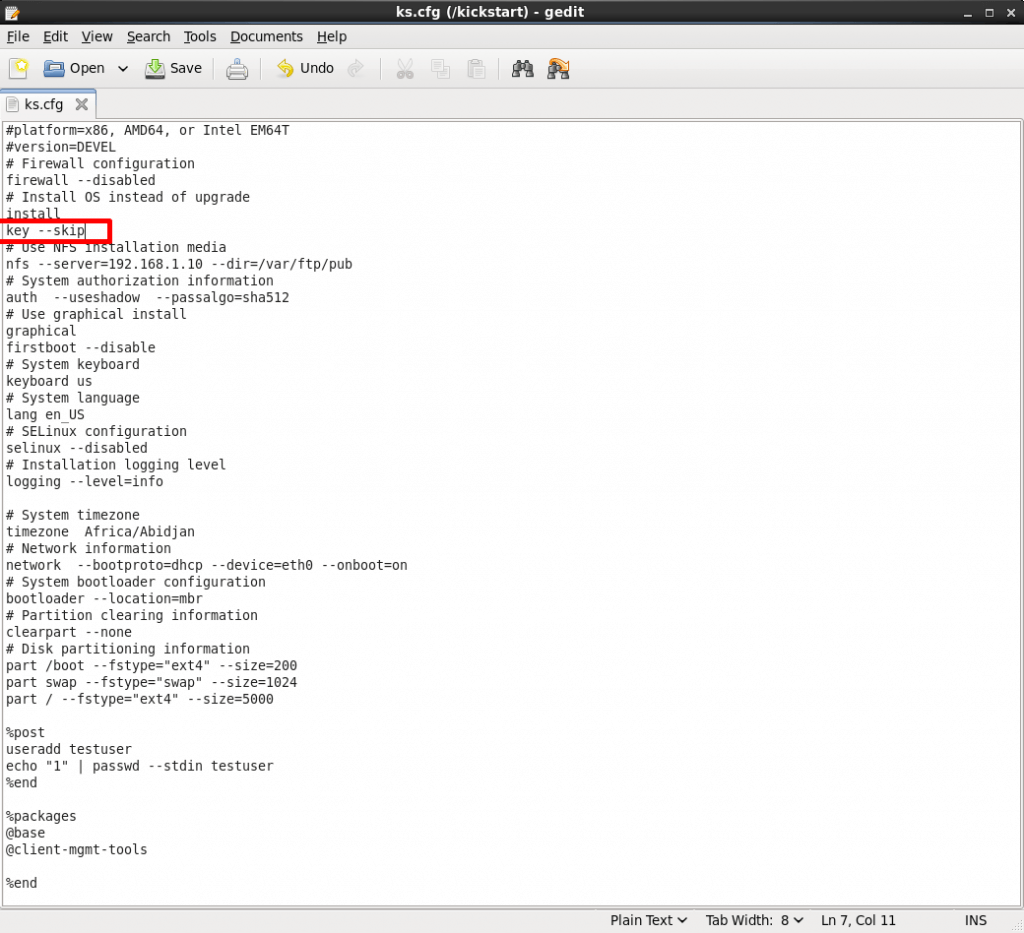
Step 16: Final Kickstart File
This is the Final “kickstart” file for our seamless installation process. But still, we have to do one more thing.
You to open the file and add the line “key –skip” as shown in the picture above and after doing that you have to save the file.
Step 17: Validate Kickstart File
Question: How to check whether our “kickstart” will be going to work or not?
Answer: You have to use “ksvalidator” to do that.

Step 18: Configure NFS server
After all the things above you have to configure your NFS server to able to deliver the necessary files to the client system to able to install the Linux on it.
Simply specify the “PATH” and “PERMISSIONS” for sharing the items.

Step 19: Configure DHCP Server
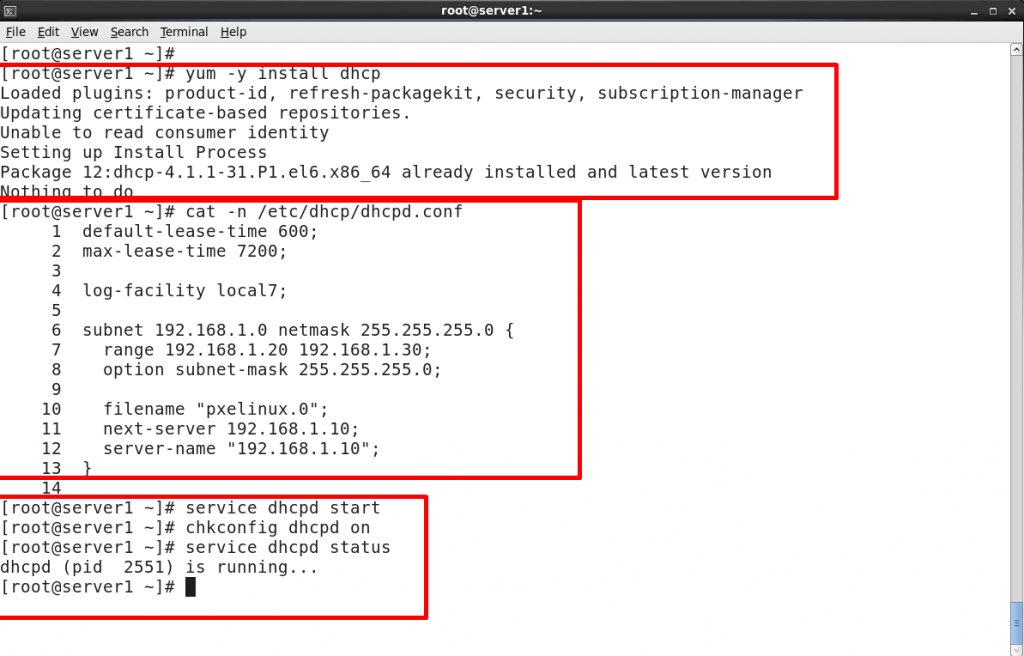
Now is the time to configure our DHCP server so that our client machines can get IP-Addresses and with the help of them they can communicate with the NFS server and can access NFS shared files by the NFS server.
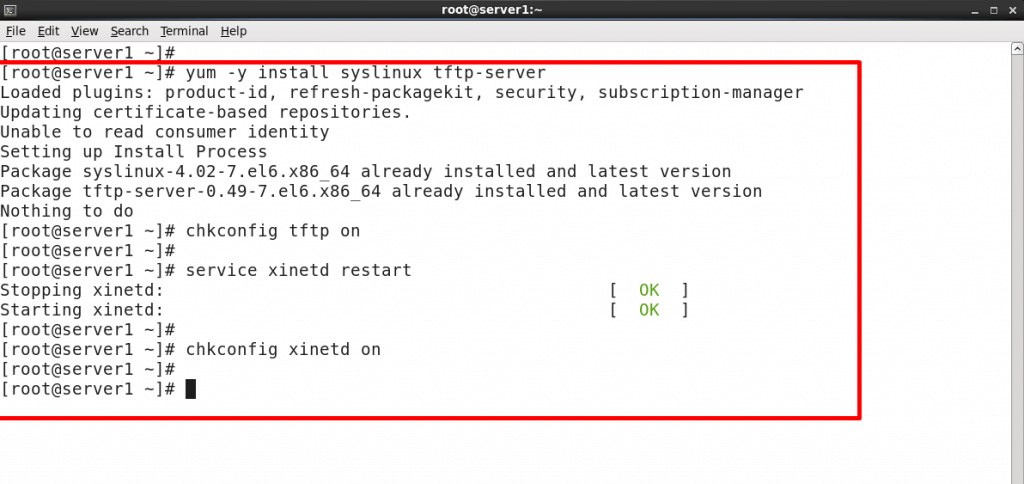
Step 20: Configure TFTP Server
Important of all:
Question: What is the need of it?
Answer: We have to give “kernel” before the installation starts. So to do so we have to implement tftp also, to supply some pre-installation files also
Step 21: Configure “tftpboot” Directory
These are contents which are going to be there in the “/var/lib/tftpboot/” directory.
Vmlinuz: This is Linux kernel executable.
Initrd.img: Initial ramdisk is a scheme for loading a temporary root file system into memory.
Pxelinux.0: IT is a Syslinux derivative, for booting from a network server using a network ROM.
Menu.c32: Only text mode Menu.
Vesamenu.c32: Graphical Menu.

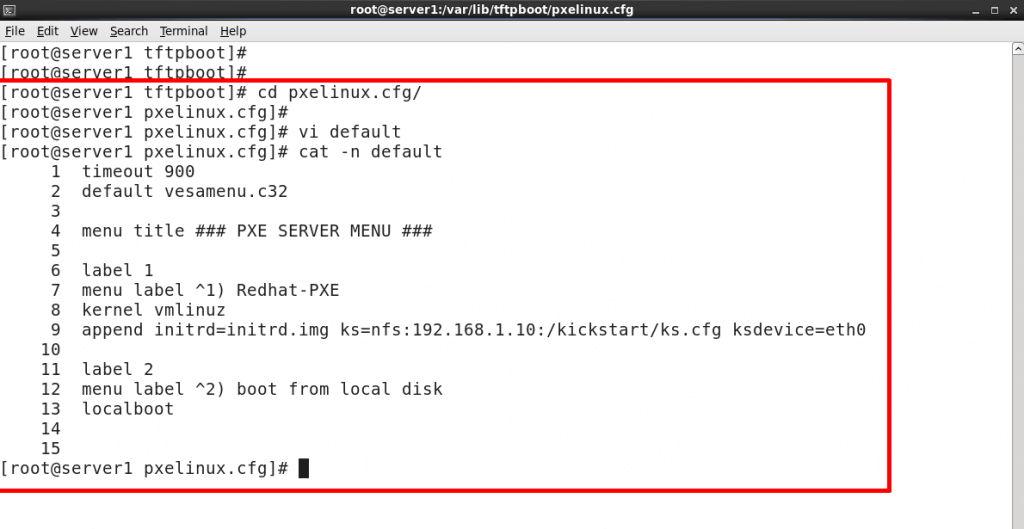
Step 22: Create “default” File
Now the question is:
Question: What is going to be there on the client system when it is booted from NETWORK?
Answer: We have to create a “default” file under “/var/lib/tftpboot/pxelinux.cfg/” and inside that file we are going to specify the menu and other stuff.
Step 23: Create A New Blank Machine
Now if your are working in a virtual environment then you have to create a blank machine and provide it all the necessary hardware like shown in the picture above.
Note: If you don’t know how to create a virtual machine then follow “Create a virtual machine in virtual box“.

Step 24: Turn On The New Machine
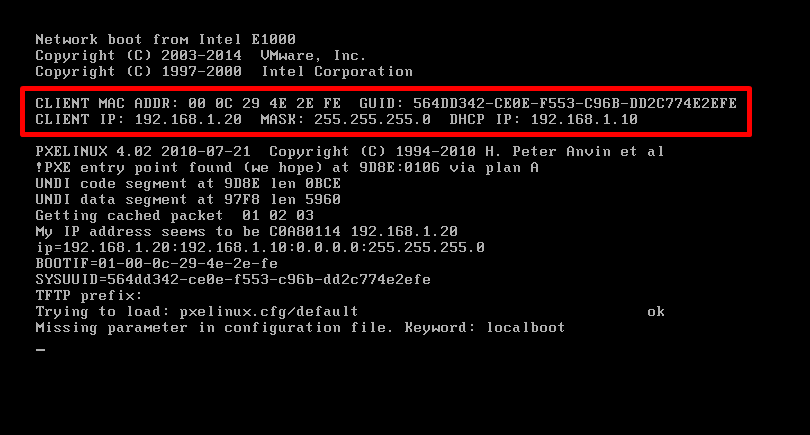
When you “Turn On” the newly created machine then you will be seeing something like shown in the picture above and if you are not able to see it or if you are getting any other kind of error and you have to trackback and check everything from the start again and try to find out the problem.
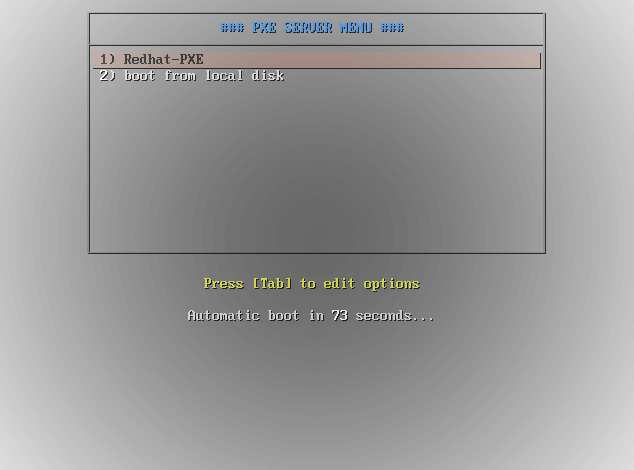
Step 25: Select Option From Menu – configure pxe installation server
This is the menu you will be seeing on the client machine.
Now after that you only have to select the 1st option i.e Redhat-PXE and after that you can go and do your other work while your Linux is going to be installed on your client system.
Step 26: Anaconda Installer Is Executed
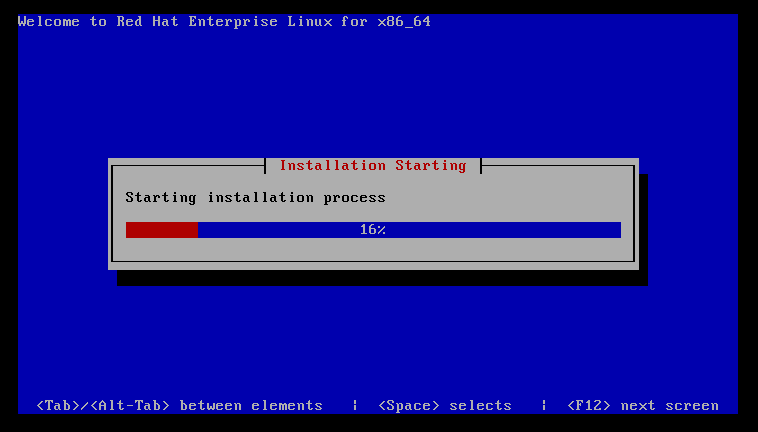
After that if you are seeing this on your screen then you don’t have to worry anymore because that’s it now you installation is going to start.

Step 27: Installation Started
Step 28: Installation Completed
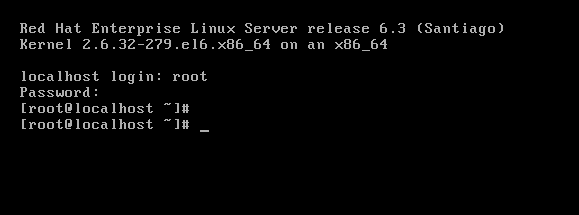
And when the installation process on the client machine is completed, you will be seeing something like this on the client machine’s screen.
Then after that you will be able to login into the machine.
Conclusion “setup and configure pxe installation server”
In this post, we have learned about how one can set up an easy pxe server on one CPU and then use that CPU to install any operating system on other machined on the same network with one click.